
Understanding what your users are searching for in your Elementor filterable galleries is gold. Are they drawn to "Branding" projects, or are "Web Design" examples driving more engagement? With a bit of custom code you can track these interactions using Google Tag Manager (GTM) and Google Analytics 4 (GA4).
This guide will walk you through setting up robust tracking for your Elementor filterable gallery, especially if you're working with an Isotope-powered layout (which Elementor "filterable galleries" use under the hood). We'll even tackle how to prevent duplicate events, giving you clean data.
Why Track Filterable Galleries? #
Filterable galleries are a fantastic way to showcase diverse content. However, as the gallery are filtered client-side, traditional analytics tools may miss what users are actually searching for.
The benefits of tracking these interactions include:
- Understand User Intent: What categories are most popular?
- Improve Navigation: Is your filtering system intuitive?
- Personalize Experiences: Tailor content based on what users are looking for.
Step 1: Prepare Your Elementor Gallery (Identify Key Selectors) #
Before we touch any code, we need to identify the unique CSS classes Elementor uses for your gallery. These will be crucial for our JavaScript snippet.
-
Go to your page with the filterable gallery.
-
Right-click on the search input field and select "Inspect" (or "Inspect Element").
-
In the browser's developer tools, look for the input field that users type their search queries into. Note its CSS class or ID.
Example HTML snippet you might see:
<div class="fg-layout-3-filters-wrap">
    <div class="fg-filter-wrap">
        <button id="fg-filter-trigger" class="fg-filter-trigger">
            <span>Tutti i partner</span>
            <i class="fas fa-angle-down"></i>
        </button>
        <ul class="fg-layout-3-filter-controls">
            <li class="control  active " data-filter="*">Tutti i partner</li>
            <li id="booking" class="control " data-filter=".eael-cf-motore-di-prenotazione">Motore di prenotazione</li>
            <li id="CRM" class="control " data-filter=".eael-cf-crm">CRM</li>
            <li id="Data Analytics" class="control " data-filter=".eael-cf-data-analytics">Data Analytics</li>
            <li id="web agency" class="control " data-filter=".eael-cf-web-agency">Web Agency</li>
        </ul>
    </div>

    <form class="fg-layout-3-search-box" id="fg-layout-3-search-box" autocomplete="off">
        <input type="text" id="fg-search-box-input" name="fg-frontend-search" placeholder="Ricerca partner ed integrazioni">
    </form>
</div>
From this, we'd note that the search input has the ID
fg-search-box-input.
Step 2: Implement the JavaScript code (with Debouncing) #
Since Filterable Galleries uses behind-the-scenes the Isotope library, we can leverage its events for more reliable tracking. In particular we may want to listen for the layoutComplete event that Isotope fires after a layout and all positioning transitions have completed.
As the filtering is done every time user digits a character in the search box we may need to debounce the event to avoid sending multiple events for the same search term.
This script combines a listener with debouncing logic for layoutComplete to ensure accurate tracking.
-
From your WordPress dashboard, navigate to Elementor -> Custom Code (requires Elementor Pro).
-
Click Add New.
-
Give it a title (e.g., "GTM Partner Gallery Search Tracker").
-
For Location, select
</body> - End. -
Paste the following JavaScript code into the editor, making sure to update the CSS selectors (
#fg-layout-3-search-box inputin my code) to match what you found in Step 1.<script> document.addEventListener('DOMContentLoaded', function() { let debounceTimer; let lastTrackedTerm = ''; // NOTE: Integrazioni e partner filterable list is implemented using Elementor's "filterable gallery" widget. Behind the scenes this widget uses `isotrope` library. To track on GA the search term used we listen for isotrope events (see https://isotope.metafizzy.co/events) jQuery(document).on('layoutComplete', function () { // If another layoutComplete event fires within that 300ms, resets the timer to avoid sending multiple times the same event clearTimeout(debounceTimer); // Set a new timer debounceTimer = setTimeout(() => { // WARNING: if the id of the search input changes this code stops working! let searchTerm = document.querySelector('#fg-layout-3-search-box input').value.trim(); if (!searchTerm || searchTerm === lastTrackedTerm) { return; } window.dataLayer = window.dataLayer || []; window.dataLayer.push({ 'event': 'partner_search', 'search_term': searchTerm }); // Remember the term we just sent lastTrackedTerm = searchTerm; }, 300); // Wait for 300 milliseconds of inactivity before running to avoid firing the event too many times }); }); </script>NOTE: In my example, the search input is identified by the selector
#fg-layout-3-search-box input. Make sure to replace this with the correct selector for your gallery's search input.NOTE 2: The debounce delay is set to 300 milliseconds. You can adjust this value based on how quickly you want to respond to user input.
NOTE 3: In my example, the event name is
partner_searchand the parameter issearch_termas these names make sense for my use case. Feel free to change them to better suit your context (just remember to update them accordingly in GTM). -
Click Publish. For the condition, choose to display it on the specific pages where your gallery exists, or simply Entire Site if you have galleries in multiple places.
Step 3: Configure Google Tag Manager #
Now, we'll set up GTM to listen for the partner_search event and its search_term parameter that our script is sending.
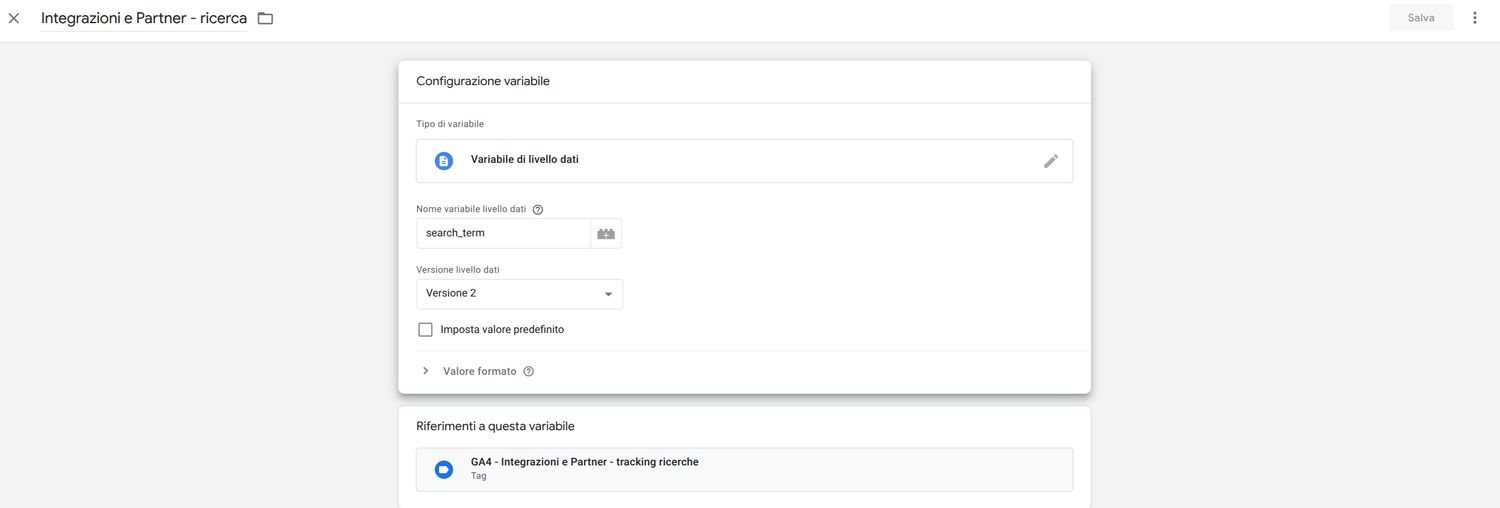
A. Create a Data Layer Variable #
This variable will extract the search_term value from the dataLayer.
- In your GTM Workspace, go to Variables.
- Under "User-Defined Variables," click New.
- Name it:
Integrazioni e Partner - ricerca(or any name you prefer, just remember it for later). - Variable Type: Data Layer Variable
- Data Layer Variable Name:
search_term(This must be an exact match to the key in your JavaScript snippet). - Click Save.
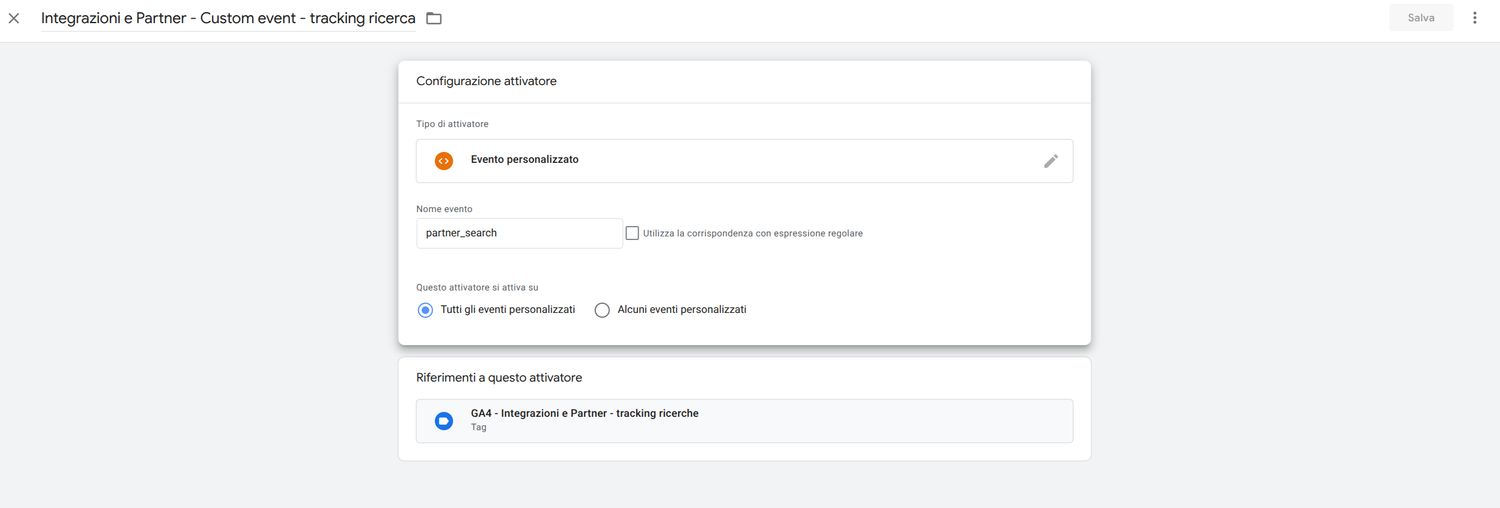
B. Create a Custom Event Trigger #
This trigger will fire your GA4 tag whenever our custom partner_search event is pushed to the dataLayer.
- Go to Triggers and click New.
- Name it:
Integrazioni e Partner - Custom event - tracking ricerca - Trigger Type: Custom Event
- Event Name:
partner_search(This must be an exact match to the event name in your script). - Leave "This trigger fires on" as "All Custom Events."
- Click Save.
C. Create Your GA4 Event Tag #
Finally, create the tag that sends the data to Google Analytics 4.
- Go to Tags and click New.
- Name it:
GA4 - Integrazioni e Partner - tracking ricerche - Tag Type: Google Analytics: GA4 Event
- Configuration Tag: Select your main GA4 configuration tag (e.g.,
GA4 - Config). - Event Name:
partner_search(This is the name that will appear in GA4 reports. You can choose a custom name here). - Under Event Parameters, click Add Row:
- Parameter Name:
search_term - Value: Click the "building blocks" icon (Variable Chooser) and select your new
{{Integrazioni e Partner - ricerca}}}variable.
- Under Triggering, click to add a trigger and select your new
Integrazioni e Partner - Custom event - tracking ricercatrigger. - Click Save.

Step 4: Test in GTM Preview Mode #
Before publishing, always test thoroughly!
- In the top right of your GTM workspace, click Preview.
- Enter your website's URL and click Connect. A new tab with your website will open, with the GTM Tag Assistant connected.
- Navigate to the page with your filterable gallery.
- Search for a term using the gallery's search box
- Go back to the Tag Assistant tab. In the left-hand summary, you should see your custom event
partner_searchappear. - Click on the
partner_searchevent. - Your
GA4 Event - Gallery Filter Searchtag should have fired. - Click on the tag itself and then go to the "Variables" tab to confirm that your
Integrazioni e Partner - ricercavariable correctly captured the name of the filter you clicked. - Try clicking the same filter multiple times. You should only see the event fire once for that specific filter due to our deduplication logic.
- Try clicking different filters. You should see a new
partner_searchevent and a successful tag fire for each new filter.
If everything looks correct, go back to your GTM workspace and click Submit, then Publish to make your changes live.
Step 5: Verify in Google Analytics 4 #
Data will start flowing into GA4 after publishing your GTM container.
A. Realtime Report (Immediate Verification) #
- In your GA4 property, go to Reports > Realtime.
- Look at the "Event count by Event name" card. You should see your
filter_gallery_searchevent appearing within seconds of triggering it. - Click on the
filter_gallery_searchevent in the card to see the associated parameters, includingsearch_term.
B. Register a Custom Dimension (Crucial for Reporting!) #
For your search_term parameter to appear in standard reports and be usable in explorations, you must register it as a Custom Dimension. You only need to do this once.
- In your GA4 property, go to Admin (the gear icon).
- In the "Property" column, click on Custom definitions.
- Click the Create custom dimensions button.
- Fill in the details:
- Dimension name:
Filter research(This is the friendly name you will see in your reports). - Scope:
Event - Description: (Optional) "Words used by users to filter the Elementor gallery."
- Event parameter:
search_term(This must exactly match the parameter name from your GA4 event tag).
- Click Save.
C. Long-Term Reporting (After 24-48 Hours) #
After registering your custom dimension and waiting 24-48 hours for data processing:
- Events Report: Go to Reports > Engagement > Events. Click on your
filter_gallery_searchevent. You should now see a card displaying theFilter Categorydimension with the most popular terms. - Explorations: For more detailed analysis, go to the Explore tab.
- Start a new "Free form" report.
- Import "Event name" and your new "Filter Category" dimension.
- Import the "Event count" metric.
- Set Rows to
Filter Category, Values toEvent count, and add a Filter forEvent nameexactly matchesfilter_gallery_search.
This will give you a clear, precise report on exactly which categories users are filtering for in your Elementor gallery.
Conclusion #
By following these steps, you've implemented a robust tracking solution for your Elementor filterable galleries. You're now collecting valuable data that can inform your content strategy and improve user experience. Happy tracking!